Meet The Hoop Bender!
A Versatile DIY Tool That Can Help Protect Your Plants From Damage


Enjoy The Cold But Prepare For The Heat
It was below freezing last night, which is pretty normal for early March here in Northwest Oregon.
While spent seedheads and frosty leaves have most folks dreaming of a cozy fireplace, smart orchardists and savvy home gardeners are already planning ahead for the heat to come.
Let me take you back. To a time long ago, in a land far away.
It was summer in a temperate region inhabited by gardeners and orchardists, and it was hot. Really hot. Hotter than most townspeople had experienced before. So hot, the local papers even reported the event as “historic”. Berries were ripening and veggies were swelling, but the people were unprepared. As the sun beat down, the leaves on their crops began to shrivel. Fruit on the bushes browned, burned, and developed necrosis. To the people’s dismay, much of their crops were lost. If only they had known how to be more prepared…..
Sound familiar? Of course it does. As you have probably guessed, this land far away was really right here in the Pacific Northwest, and a time long ago was last summer during an event most of us referred to as - THE HEAT DOME.
But wait. It’s freezing out. Why are we talking about burning fruit and the heat dome?


It’s because I am an excellent advanced planner. Always prepared and forever one step ahead of mother nature.
Gotcha!
Truth be told, last year when this historic heat event hit, I was running around stringing sheets and tarps willy nilly all over the place, just like many of you. I ordered shade cloth of varying sizes a day too late and spent a good deal of creative energy figuring out how to string them up with ropes and bungee cords for maximum coverage of gardens and plantings scattered across a large property.
This is a scene I don’t intend to repeat! This year I will actually be a good advance planner, beginning with making sturdy but portable hoop structures to cover my small fruit rows and younger plantings.
So come along, while I introduce you to a very handy tool called a Hoop Bender and show you just how easy it is to use.
Hoop Bender, Pipe Bender, Conduit Bender, Arch Bender:
All different names for a DIY tool designed to bend metal conduit into arch shaps of all different sizes. The tool I am going to demonstrate for you in this tutorial is a store bought bender, but I will also include some links for cheaper DIY versions you can make yourself at the end of this post.
Shade Tunnel, Low tunnel, High Tunnel, Caterpillar Tunnel, Polytunnel, Hoop House:
All covered structures that are used to extend the growing season and / or to protect crops from weather (say, a historic heat event), and some pests. Often they are constructed with metal hoops that have been bent with - you guessed - a hoop bending tool.

The usefulness of a bent hoop framework is of course not limited to providing shade, and this framework is most often used in farms and gardens as a season extender or crop protector.
Installation can be permanent or temporary depending on your needs. Hoops can be made in all different heights and widths. Small enough to fit over a single plant, long enough to cover your entire berry row, or large enough to span an entire section of garden. They can be covered with pest netting, shade cloth, frost cloth, or plastic sheeting depending on your desired use.
On top of garden specific applications, hoops can even create the framework for small animal pens. Imagine an enclosed chicken tunnel that meanders throughout your orchard or a bug catching chicken “moat” that encircles your garden.
Let's dive in and show you how easy it is to bend your own!
For reference, the following project (not including the trip to buy the supplies) took less than an hour.

Step One: Source your metal conduit. In the photos here, I am using ½” metal conduit in 10’ lengths. The instructions that come with your hoop bender should tell you what size conduit you can use with the bender you have. If you made your own, google can help you determine the appropriate size. You can find conduit at most home improvement stores.
Step Two: Install your hoop bender. Find a sturdy table, deck, stump, or other surface on which to mount it. The bender shown here is store bought, but I will share some DIY resources at the end of the post. I find it helps to choose a location that is at least thigh high and no taller than your waist. Some folks even mount theirs vertically onto a wall or the side of a barn. It has two mounting holes and comes with your choice of bolts or screws. It’s easy to remove when you’re done, so don’t worry it doesn’t need to be a permanent fixture.
Step Three: Depending on the size hoop you are bending, you will measure and make a couple of marks on each pipe. These are guidelines that will show you where to insert and bend the pipe. If you have a store bought bender, the instructions will tell you where to mark.
Step Four: Insert the conduit to the appropriate mark and - bend it! It’s easier than you think. You can probablydo this alone, but I find that acquiring a teenager makes the job much……..well actually it made the job much slower but it was nice to get him out of the house anyway.


Step Five: After all of your pipes are bent, see if you can coax some chickens to eat something next to your finished hoops. It will make your messy property look more like a farm in photos, and people tend to trust you if they think you’re a farmer. You trust me, right? No? Maybe this photo will help:
Step Six: Time to get those hoops in the ground!
There are many ways to anchor hoops into the earth, but for this simple application we are going to use pre-cut pieces of rebar. Take your rebar pieces, pound them halfway into the ground, then slide your hoops over them. If your soil is soft enough, push the hoops down into the earth a ways. In my soil, this provides enough stability for casual use, but also makes it very easy to remove if I want to move the hoops to a different area or replace them with larger hoops as the plants grow. Depending on your hoop size and environment, you may want to add a stabilizing spine across the top, tie some anchor lines to each end hoop, or experiment with more heavily anchored options, but I find that simply pushing them securely into the ground over the rebar stakes works well enough for small shade structures like these.
These photos show the installation of a very basic hoops structure meant to hold a lightweight shade cloth, over a brand new blueberry bed in a home garden. As you see - you don’t need perfectly straight rows to be able to use hoops.

pre-cut lengths of rebar

Pound the rebar into the ground
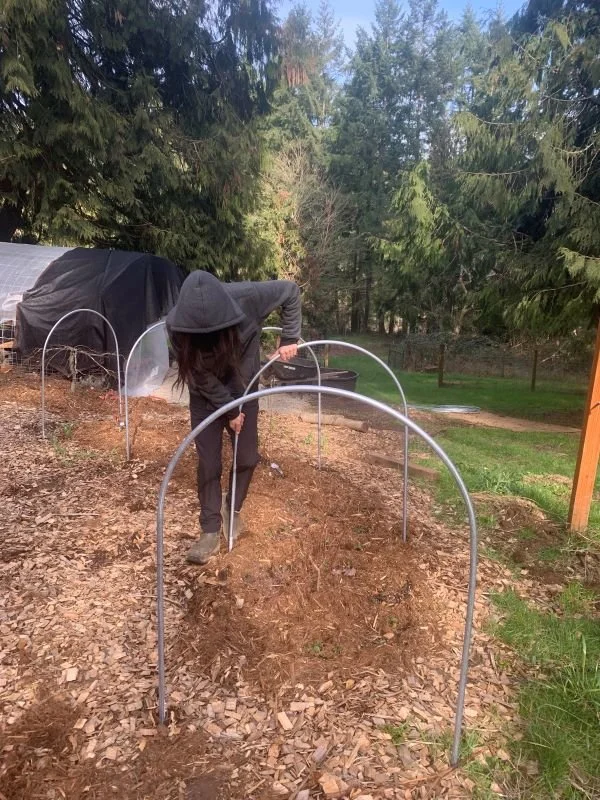
Pushing the hoops over the rebar and down into the ground.

Step Seven: Stand back and marvel at the fact that this entire process - from unboxing the hoop bender, to the finished product - took less than an hour!
Ready to start bending?
We do NOT receive any type of compensation for sharing these links or tools, they are just included to be helpful.
Where to find pre-made hoop benders:
Or make your own bender:
Short Video Demo: Farm Glance: Off Beet Farm's DIY Pipe Bender
Video Instructional: Two New Tubing Benders for Garden Hoops - by Mark Schultz
Photo Tutorial: Scrapwood Bender - Instructables
Don’t want to buy or make the tool yourself?
Concentrates NW - sells pre-bent hoops. They are located right here in Clackamas County but they ship also. Fair warning they have so much good farm and garden stuff, you may end up buying more than you planned!
Your local Neighborhood Garden Groups - make a post and ask if any neighbors have a hoop bender. My teenageer for example will bend hoops for folks for a couple of bucks. Perhaps there is someone near you who will do the same.
For more tips and tricks for sun protection and to learn how to protect larger plants like fruit trees, make sure to read through Preventing Sun Damage In The Home Orchard - another helpful post here on the HOEC Blog.


Happy Orcharding All!