Help A Fella Out? Literally!
It’s time to harvest & clean our mason bee cocoons!


If you are reading this post, chances are you're already interested in “keeping” Mason bees and know why their presence in your garden can bee such an excellent idea! But were you aware that a part of their care involves removing each tiny little cocoon from it’s home for inspection, sanitation, and pest control? Read on to find out why cleaning cocoons is an important part of your Mason bee journey, and learn how to do it yourself.
What Is A Mason Bee?
“Mason" bee, is a general term for solitary, cavity nesting bees who use mud to build chambers for their eggs, and belong to the Genus: Osmia. There are more than 500 different species of mason bee, and more than 130 of those can be found in the US and Canada. The two most commonly managed mason bees in our area are: Blue Orchard Mason Bee & Japanese Orchard Bee (AKA Hornfaced Bee), but that doesn't mean you won’t find others in your yard or nesting materials.
What is a Leafcutter Bee?
You may also have heard of leafcutter bees. Leafcutters are another group of solitary cavity nesting bees that you may find nesting in your mason bee housing. Although they may share the same nesting areas, leafcutter bees are not mason bees. Unlike mason bee cocoons, leafcutter bee cocoons are made from chewed up leaves, petals, and sometimes resins and they are NOT waterproof. When learning about care & cleaning of cocoons today, know that we DO NOT wash leafcutter bee cocoons!
Are mason bees native to North America?
Over 300 species of mason bee can be found across the Northern Hemisphere.
About 139 of those are native to North America.
An additional three or so have been introduced to the continent purposely for agricultural purposes.
TO CLEAN OR NOT TO CLEAN. WHY MESS WITH NATURE?
Each autumn in the HOEC Community Orchard, we practice annual removal (harvesting), disinfecting, and safe cold storage of mason bee cocoons & housing. This extra bit of work gives the bees a hand up and increases their odds of surviving to fly in the spring.

We interfere for a better quality of life & increased survival and pollination rates.
In a perfect world, pollinators wouldn't need our support! Unfortunately, the combination of introduced parasites, disease, habitat loss, increased pesticide use, climate change, unhealthy farming & landscape practices, and removal of native plants drastically impact the survival rate of our flying friends.
So what are we protecting them from?
Loss of habitat & forage
Pesticide damage
Parasites
Mold
Disease
Predation
Weather related death
Increased Pollination Window
Another reason we might manage mason bees is that it allows us to stagger their release dates in spring. This is helpful to:
Decrease risk of bee death due to late spring freeze or lack of available blooms.
Increase the window for pollination of early blooming plants.
SIGNS OF PARASITES & DISEASE:
Exactly what are we looking for?

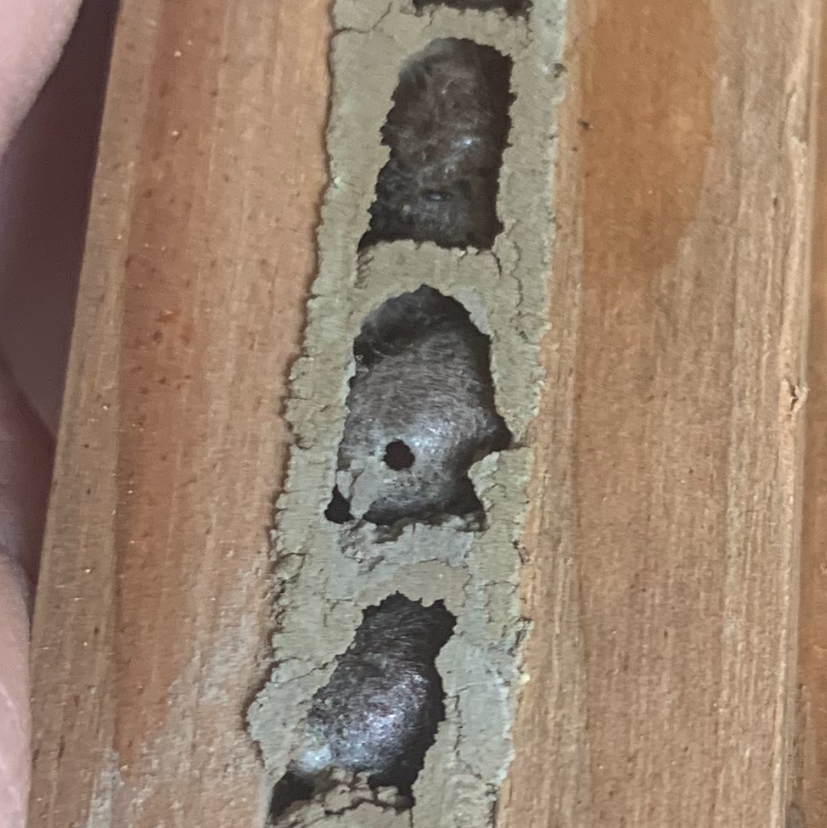


Above are some images of things we have found while cleaning out mason bee housing. To acquaint you with some of the things you may see inside your bee housing during your fall harvest, the following is a list of parasites and diseases most common to this area. For a more in depth explanation of each parasite with photos, we direct you to Crown Bees Pest & Disease of Mason Bees.
Pollen Mites: Tiny mites that are difficult to see with the naked eye unless you have good sight and look closely. It’s not necessary, but if you are someone with a microscope at home this is a great use! A bee cocoon up close is pretty amazing to see.
Chalkbrood: A highly contagious and killer fungal pathogen. What you will see will be dead, grey/black, and sometimes chalky looking. The fungal spores are still attached to the infected larva/cocoon.
Houdini Fly Maggots: These look like, well...maggots! Tiny wriggling sticky bumpy grains of rice.
Parasitic Wasp Larvae: Look very similar to Houdini Fly larvae. If you’re not sure which is which, it’s okay, just remove them anyway!
Meal Moths: These look like a small, light colored grub or mini caterpillar.
Carpet Beetle Larvae: Short, fat, caterpillar-like larvae.
Blister Beetle Cocoons: Brown cocoon-like sack or pod that doesn't look at all like a mason bee cocoon.
Small Holes: You may see small holes in a cocoon or drilled through a mud end cap. This is evidence that a parasite had deposited eggs inside of the cell.
Mold: Mold happens when moisture is trapped inside of the housing. If you see mold in your house, consider re-assessing the rain cover and / or making sure you are using breathable materials.
Dead Bee Larvae: You may come across mummified bee larva from chalk brood or unknown disease.
Deflated, Crunchy, Or Indented Cocoons: Sometimes it’s obvious that the bee larvae were eaten, didn’t develop properly, or that it’s not a bee inside of that cocoon! Other times it’s not so clear, so make sure to read up, do some experimenting, and if you aren’t morally opposed - cut open a few questionable cocoons to see what’s inside and get a better feel for what a healthy cocoon looks like and what ends up exposing a wiggling mass of little maggots.
After all of that depressing talk about parasitism and mason bee body snatching, let’s toss in a friendly critter you may find in your nest as well!

Grass Carrying Wasp Cocoons: Generally considered to be beneficial, this is a solitary wasp that does not harm mason bees or sting humans to defend their nests. Rather than stealing pollen from nesting bees, these wasps line their tube with grass and then bring in their own meal consisting of paralyzed tree crickets. You can tell this cocoon apart from the bee cocoons, because it is usually wrapped with grass and surrounded by tree cricket wings.
WHEN TO HARVEST COCOONS?
The HOEC arboretum is located in the Pacific Northwest in zone 8b.
While it is okay to very gently take down and protect your mason bee housing in late summer, (more on this later) the bees are not fully developed and not ready to be handled for cleaning until fall. Here in the orchard, we harvest, and clean our cocoons any time between October through December.
Here is a snapshot of what is happening inside of the cocoons:
Throughout spring and early summer the female bees insert a series of tiny eggs and pollen into each tube and protects them each with a divider wall of mud.
Next, the tiny eggs hatch into larvae.
The larvae feed on the stored pollen and spin a cocoon in which to pupate.
The pupae transform into an adult stage inside of the cocoons by late August / early September.
The young adults then enter a period of reduced metabolic activity aka diapause, similar to hibernation that allows them to maintain energy stores until spring.
TYPES OF HOUSING & EASE OF HARVESTING COCOONS
There are many different options for housing your mason bees and the type of housing you choose will determine if, and how easily you are able to remove the cocoons for cleaning.

REUSABLE TRAYS:
These stacked trays can be lifted apart and the cocoons very easily removed with a small dowel or stick with a rounded or tapered head or a flat headed screwdriver or similar (non-pointy) implement. Just go slow and be careful not to damage the cocoons as you pop them out. We think these trays are probably the easiest type of housing to open and remove cocoons from, although our own bees don’t usually favor this style over paper tubes.
CARDBOARD TUBES WITH PAPER LINERS:
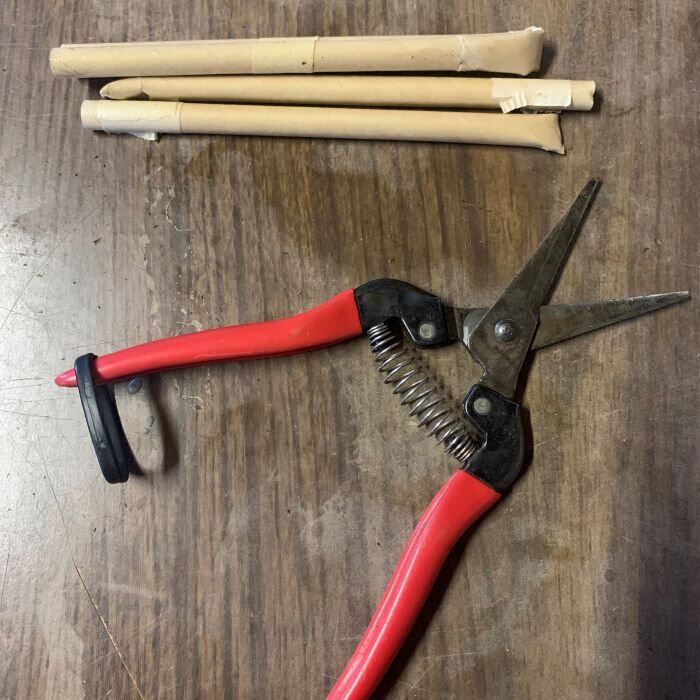
The Mason bees in the arboretum prefer to nest in these specially made waxed cardboard tubes with a paper liner over other options offered. Of course they do, because using tubes & liners requires a yearly purchase, and they are much more time consuming and labor intensive to harvest than the reusable trays mentioned above ;) To remove bees from this type of housing, first pull the paper inserts out of the cardboard tubes if you used them. Next, unravel the paper liners, If the paper liners aren’t coming out easily, you can carefully slice open the cardboard tubes fine pointed snips. When shopping for cardboard tubes and liners, we suggest looking for thicker wax coated tubes, as these are harder for predators to penetrate with a stinger.
One theory for our bees preference of cardboard tubes is that it takes quite a bit more labor and mud to “caulk”all of the gaps in a tray than it does in a tube.
EASY OPEN NATURAL REEDS (NOT BAMBOO)
Gather your own or buy them from a reputable source. Just make sure they crack open easily so you don’t damage the cocoons trying to open them later. Here is a link to a video posted by Crown Bees that will show you how to open natural reeds.

SOLID BLOCKS WITH HOLES DRILLED IN THEM
Many of the mason bee houses sold online or in big box stores are designed as solid pieces of wood or plastic with holes drilled into them. This design does NOT open and is NOT conducive to removal of cocoons or proper sanitization of the house. When using this style of house, if you want to be able to harvest your cocoons and provide them with a disease free living space, you will need to purchase and line the holes (if they are the correct size) with a special sturdy paper straw referred to as a bee tube. If this is the style of housing you used this year without paper liners, you will unfortunately not be able to harvest or clean the cocoons.
HOW TO HARVEST THE COCOONS:
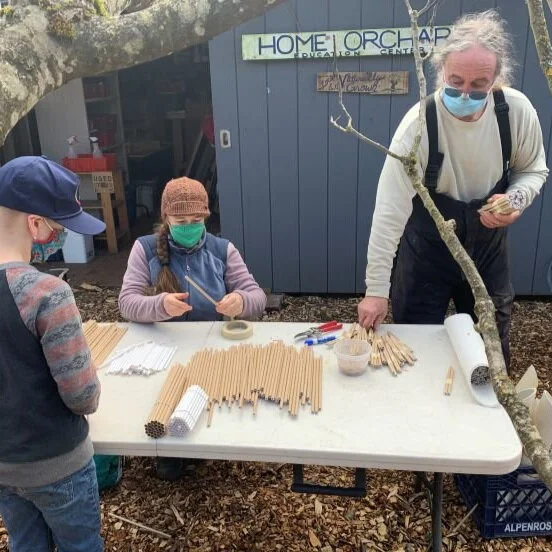
Call some friends to help! Harvesting cocoons can be a fun way to connect while learning something new and encouraging friends or neighbors to adopt some bees of their own. Don’t be afraid to handle your bees, but remember to do so carefully. At this stage they are in a state of reduced metabolic activity and can handle some activity, but overly rough handling can still damage the adult inside the cocoon.
*Please note: The instructions below are for how we clean cocoons in the HOEC arboretum. Different bee stewards can have slightly different methods, but this is what has historically worked well for us. Feel free to experiment a bit and see what methods you prefer!
🐝 STEP 1: Set Up
Set up your sorting workstation. In the arboretum, we harvest and sort outdoors so there is space for a whole team of students and volunteers, and to keep the cocoons cool during this part of the process.
Our sorting workstation includes:
Tables
Fine pointed scissors for opening tubes (we use mostly tubes in the arboretum).
Containers to sort the cocoons and debris into.
Colander for sifting debris.
Spray bottle of disinfectant to use on our tools and tables in between blocks and tubes.
Small bucket of clean play sand.
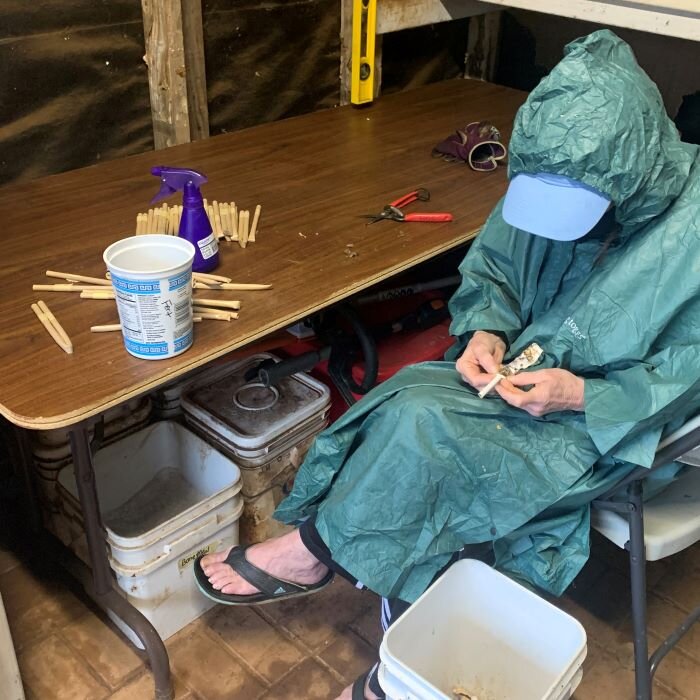
🐝 STEP 2: Open
Carefully remove, un-peel, or open your protective habitat and remove the cocoons. (see the section above - TYPES OF HOUSING & EASE OF HARVESTING COCOONS - for instruction on removing cocoons from different types of housing)
🐝 STEP 3: Sort
You can organize this any way that makes sense to you, but we suggest having three containers on hand:

“Keeper cocoons” that look good right off the bat. These make it through to the next step of cleaning without further fussing.
Things to “investigate further”. This includes questionable cocoons or interesting finds that require a second look or things you want to take photos of. Some of these will make it back to the keeper cocoon bin and the rest will be tossed out with the debris.
Obvious refuse such as predatory larvae, dead bees, deflated cocoons, pollen blocks, frass, and random debris. These go into the trash for removal from the property in case of infection with disease or mites.
🐝 STEP 4: Clean
Fill a small container or a jar with a lid part way with dry sand and add the “keeper cocoons”. Gently roll them around to remove frass, mud particles, and pollen. If you’re using a jar, you can close the lid and gently shake it back and forth.
🐝 STEP 5: Sift
Transfer your cocoons into a small holed colander and repeat the gentle rolling process to remove more mud and frass. Don’t worry, they should still be fast “asleep” and won’t be too bothered by the process as long as you don’t draw it out too long or let them get too warm.

Lidded jar with sand. mason bees placed on top and then gently shaken back and forth.

Cocoons in a slotted spoon to sift out larger debris.
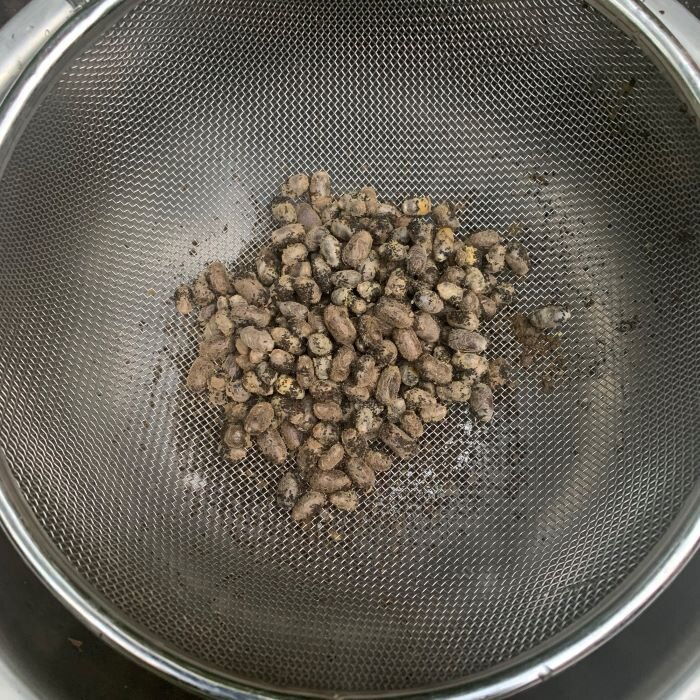
Cocoons in a fine mesh colander to sift out smaller debris.
🐝 STEP 6: Disinfect
This step is especially important if you have identified chalkbrood in any of your tubes. We have personally seen evidence of chalkbrood inside of bee tubes, so this is a step we do not skip.
Place your sifted cocoons into a large bowl or container. Fill the bowl with a 5% bleach solution (1 tablespoon of bleach to 8 cups of cool water). Swirl the cocoons around to knock off remaining debris for approx 1-2 minutes.

Cocoons being cleaned gently in a solution of bleach and water.

Removing cocoons from bleach solution with a slotted spoon helps leave the frass behind.
🐝 STEP 7: Rinse
Strain the cocoons out of the bleach solution and rinse them very thoroughly with cool running water making sure to remove all traces of bleach.
🐝 STEP 8: Examine
Once the cocoons are clean, it is much easier to see signs of damage or parasites. Take this time for one last sort of the cocoons. Be on the lookout for pollen mite frass, parasitic wasp holes, houdini fly larvae, evidence of chalk brood, dermestid beetle larvae, and crunchy empty feeling cocoons. (See the next section below for a more thorough explanation and photos of some common things you may find.)
🐝 STEP 9: Dry
At this point, we bring the cocoons inside for a brief period to let them dry off, or if it’s not too cold out, find a covered space on the porch where they won’t blow away. Pat the cocoons dry with a clean rag or paper towel and then place them on a screen or towel and allow them to thoroughly dry somewhere with good airflow for around 30-60 minutes. We like to check on them a few times, and if the paper towel feels damp, we swap it out for a dry one. It is important that the exterior of the cocoons dry well so they don’t mold, but be mindful not to completely dehydrate them.

Inspecting clean wet cocoons one last time.

Drying cocoons on paper towels.
🐝 STEP 10: Cold Storage
All managed Osmia species require exposure to cold temperatures over winter for a successful re-emergence the following spring. Safe cold keeping of your now clean & disinfected cocoons also prevents ill timed re-emergence should there be a mid-winter thaw.
Temperature
Depending who you ask, optimal cold storage conditions are between about 34-39°F. Fortunately, this is a typical range for most refrigerators.
Humidity
The same applies to the level of humidity. Depending who you ask you’ll want to make sure to keep the cocoons between 50 to 75 percent humidity. You can accomplish this fairly easily by following the instructions for proper storage containers below.
Storage Containers:
The basic needs for cocoon storage inside of your cold storage area are:
protection
air flow
moisture control
You can easily make a safe storage container of your own using things from your recycling bin, or you can purchase a pre-made container like this very inventive Stackable Mason Bee Cocoon Storage - Fridge Humidity Container that your author bought on Etsy this year! (We are not affiliated with this product, just thought it was a pretty cool use of a 3D printer!)


OR MAKE YOUR OWN:
Find a plastic container with a lid and poke holes in the lid.
Fill it with your cocoons.
Find a slightly larger plastic container with a lid that your first container will fit inside of and poke holes in that lid as well.
Place the smaller container inside of a larger container.
Get a piece of paper towel or cotton ball wet, and place it inside of the large container, but outside of the small container.
Make sure to periodically check on the cotton ball/paper towel it is still moist and that no mold is growing.
If you want to get really fancy, or if it’s your first time storing bees, you can buy a little humidity gauge to place inside just to be sure.
LISTEN TO LEARN MORE
Take a deeper dive into the interesting world of the Mason bee!
The free online archives of the PolliNation Podcast operated by Oregon State University Extension Service, offers a vast array of interesting bee related interviews, stories, and reports. You can also find written transcripts of the podcasts if you prefer to read.
Interview With Ron Spenda - The Secret Lives Of Bees: Episode 138
Fun, local, informative, experimental, and easy to listen to. Ron is a down to earth all ages educator local to the Pacific Northwest who offers numerous unique and creative research & viewing opportunities in the surrounding areas.
Interview with Lila Westreich – The Secret Life of Mason Bees: Episode 125
Many of us put mason bees out in our backyard or farm. But when they leave the nest, do you know where they are going to forage? In this episode we hear how a sleuthing graduate student in Seattle is beginning to piece together a picture of what resources these bees are actually using.
Interview with Michael Bransetter - The deep history of the mason bees: Episode 179
Get your nerd on! This episode explores evolutionary history and genetics research related to the blue orchard mason bee.
REFERENCES USED IN THE CREATION OF THIS POST
https://extension.oregonstate.edu/sites/default/files/documents/12281/masonbee.pdf
https://catalog.extension.oregonstate.edu/sites/catalog/files/project/pdf/em9130.pdf
https://www.fs.fed.us/wildflowers/pollinators/pollinator-of-the-month/mason_bees.shtml
https://www.fs.fed.us/wildflowers/pollinators/pollinator-of-the-month/megachile_bees.shtml
https://www.sare.org/publications/managing-alternative-pollinators/chapter-six-mason-bees/lifecycle/
https://catalog.extension.oregonstate.edu/sites/catalog/files/project/pdf/em9130.pdf
https://crownbees.com/parasites-and-diseases-of-mason-bees/
The Orchard Mason Bee, Brian Griffin, 1999, Knox Cellar Publishing.
Pollination with Mason Bees, Dr. Margriet Dogterom
All About Mason Bees, DVD, Dr. Margriet Dogterom
How to Manage the Blue Orchard Bee, Jordi Bosch and William Kemp
Orchard Mason Bee, Washington State University publication, PLS -112
Interested in purchasing pre-cleaned, sorted, and sanitized Mason Bee Cocoons of your own? Each year we offer pre-cleaned and sorted bees for pickup here in the orchard. Keep an eye on our Mason Bee Sale Page for purchase. All proceeds go towards supporting HOEC, and the creation of more educational resources like these. Thank you in advance, and happy Mason Bee stewarding! ❤️